Pages

Wednesday, March 21, 2012

10 Best Practices of Code Commenting & Formatting


Code commenting and formatting are all about code understandability. Code understandability is very relevant to code maintainability. So, small details about programming may help maintainability. In this context, some practices about commenting and formatting will be told here:

Commenting

Comments may be thought as part of the code, so they are really important. E.g. a commentless code library will be useless in a short time with high probability. Even though there are some approaches which suggests self-documenting code over code documentation, we suggest (self-documenting code + code documentation).
  1. Use comments "as required". 
    • Unnecessary over-commenting in each line will reduce readability:
      • int count = 0; // assigning zero as initial value to the count (?!?)
    • Lack of commenting will increase maintenance time. Also, variable/method names should be understandable and self commenting
      • int s = sqrt(v1) + v2 / v3 + fread(s). getChar(0)  //(?!?)
      • List<int> getVal(int val, int len, String op) //(?!?)
  2. Don't write uncorrect comments. Uncorrect explanations are worse than no-comment. 
  3. Write comments for variables which are important and non-selfdocumenting.
  4. Writing comments (e.g. JavaDoc declaration) for all public methods is a good practice. Of course, these comments should be "really necessary" and "as required".
  5. Document "gotcha"s and "todo"s instantly when detected. These items may be remembered for that day but may not for tomorrow when not documented, so a buggy code will be inevitable.
Formatting

Formatting rules can be detected automatically by most tools (e.g. maven checkstyle) and applied automatically by most IDEs (e.g. Eclipse Code Formatter ctrl+shift+f). But there may be little differences between company formatting rules, so these tools should be configured before applying formatting.
  1. Use brackets consistently. You may choose opening a bracket at the end of the current line or at the beginnning of the new line. Choose one of them and use consistently in the whole application.
  2. Use blank lines consistently and as required. Blank lines may be used for separating  code lines or line groups semantically for readability. E.g. 3 blank lines at the end of a method, no-blanks on whole code or one or two blank lines between each line of code reduces readability and not good for eye pleasure.
  3. Pay attention for indentation. Correct indentation for grouping statements is as important as using brackets and blank lines.
  4. Character count of a line should be limited for readability. This limit is generally 80 for most developers, but may change a little due to some other development parameters. 
  5. Using space chars in code should also be consistent in whole application. Generally, situations below are suitable for using spaces:
    • Between operators and operands: 
      • a += b , c = 0; (a == b)
    • Between statement keywords and brackets: 
      • if (value) {, public class A { 
    • After ';' char in loops: 
      • for (int i = 0; i < length; i++) 
    • Between type casters and operands: 
      • (int) value , (String) value


Wednesday, March 7, 2012

2 Implementations of "Chain of Responsibility" Pattern with Java


Chain of Responsibility design pattern is needed when a few processors should exist for performing an operation and a particular order should be defined for those processors. Also the changeability of the order of processors on runtime are important.

UML represantation of the pattern is as below:


Handler defines the general structure of processor objects. "HandleRequest" here is the abstract processor method. Handler also has a reference of its own type, which represents the next handler. For this a public "setNextHandler" method should be defined and exactly the handler is an abstract class. 
ConcreteHandler define different representations of processors. At last, Client is responsible with creating required handlers (processors) and define a chain order between them.

Generally two diffent implementation may exist for this pattern. Difference is related with the "location of the chain routing business logic". Chain routing business logic may be either in Handler abstract class or ConcreteHandler classes, or both of them. Sample of first two approaches will be given below:

1. "Handler" has chain routing business logic:

  1. public abstract class Processor {
  2.     protected Processor next;
  3.     protected int threshold;
  4.     public void setNextProcessor(Processor p) {
  5.         next = p;
  6.     }
  7.     public void process(String data, int value) {
  8.         if (value <= threshold) {
  9.             process(data);
  10.         }
  11.         if (next != null) {
  12.             next.message(data, threshold);
  13.         }
  14.     }
  15.     abstract protected void processData(String data);
  16. }
  17. public class ProcessorA extends Processor {
  18.    
  19.     public ProcessorA (int threshold) {
  20.         this.threshold = threshold;
  21.     }
  22.     protected void processData(String data) {
  23.         System.out.println("Processing with A: " + data);
  24.     }
  25. }
  26. public class ProcessorB extends Processor {
  27.    
  28.     public ProcessorB (int threshold) {
  29.         this.threshold = threshold;
  30.     }
  31.     protected void writeMessage(String data) {
  32.         System.err.println("Processing with B: " + data);
  33.     }
  34. }
  35. public class Client {
  36.     public static void main(String[] args) {
  37.         Processor p, p1, p2;
  38.         p1 = p = new ProcessorA(2);
  39.         p2 = new ProcessorB(1);
  40.         p1.setNextProcessor(p2);
  41.         // Handled by ProcessorA
  42.         p.process("data1", 2);
  43.         // Handled by ProcessorA and ProcessorB
  44.         p.process("data2", 1);
  45.     }
  46. }

2. "ConcreteHandler"s have chain routing business logic:

  1. public abstract class Processor {
  2.     protected Processor next;
  3.     protected int threshold;
  4.     public void setNextProcessor(Processor p) {
  5.         next = p;
  6.     }
  7.     abstract protected void processData(String data);
  8. }
  9. public class ProcessorA extends Processor {
  10.    
  11.     public ProcessorA (int threshold) {
  12.         this.threshold = threshold;
  13.     }
  14.     protected void processData(String data, int value) {
  15.         System.out.println("Processing with A: " + data);
  16.         if (value >= threshold && next != null) {
  17.             next.processData(data, value);
  18.         }
  19.     }
  20. }
  21. public class ProcessorB extends Processor {
  22.    
  23.     public ProcessorB (int threshold) {
  24.         this.threshold = threshold;
  25.     }
  26.     protected void processData(String data, int value) {
  27.         System.out.println("Processing with B: " + data);
  28.         if (value >= threshold && next != null) {
  29.             next.processData(data, value);
  30.         }
  31.     }
  32. }
  33. public class Client {
  34.     public static void main(String[] args) {
  35.         Processor p, p1, p2;
  36.         p1 = p = new ProcessorA(2);
  37.         p2 = new ProcessorB(1);
  38.         p1.setNextProcessor(p2);
  39.         // Handled by ProcessorA
  40.         p.processData("data1", 1);
  41.         // Handled by ProcessorA and ProcessorB
  42.         p.processData("data2", 2);
  43.     }
  44. }

Friday, February 24, 2012

Customized Internationalization (i18n) in Java - Step by Step


Internationalization (i18n) is very important in our software projects. It brings mainly these benefits:

  • Externalizing UI strings into external files other than code files and so easy-to-manage UI content.
  • Supporting multiple languages.

In this post, a brief practical example of i18n will be given for Eclipse and Java projects, including customizing i18n mechanism to have more maintainable and encapsulated approach.


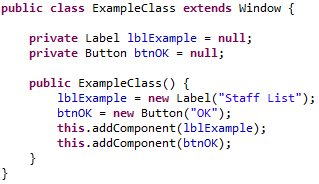
  • First, we must have some classes which includes string values shown on user interface:
An example UI class


  • Then we must have an instance of an i18n utility class. This is generally one of the two in Java:
    • java.util.ResourceBundle (doesn't need spring dependency)
ResourceBundle initialization


    • org.springframework.context.support.ResourceBundleMessageSource (has multiple word externalization capability (which will be told later)).
ResourceBundleMessageSource initialization


We'll use ResourceBundleMessageSource instance in this tutorial because of its extended capabilities.


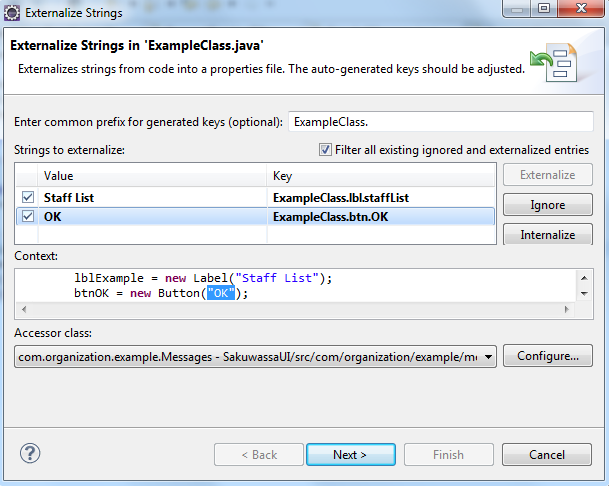
  • Then right click on the class and choose Source --> Externalize Strings. A window as below will be shown. Enter keys for strings into the right column. Keys will be started with class name as default. Keys must be unique on the system, so a predefined pattern should be applied (e.g. <class_name>.<type_id>.<description>)

Eclipse string externalization window


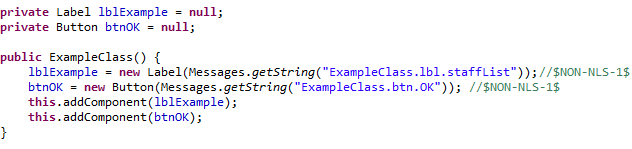
  • Click Next--> Finish and your strings will be changed as follows. And also Messages class and externalizer properties file will be created automatically (auto-comments on the right are markers for eclipse which means  "externalized"):
Class with externalized strings


Auto-created i18n utility and property classes


  • Now externalization is complete. But we want i18n, and we must support multiple languages. For this, define another properties file with location post-tag (e.g. "EN", "FR", "TR", ...), copy keys and fill values with new language and set locale of resource bundle in a proper place/action of your application (e.g. on settings window or login page):
Multiple property files for each language


Messages_tr_TR.properties file content


Setting new locale to the resource bundle


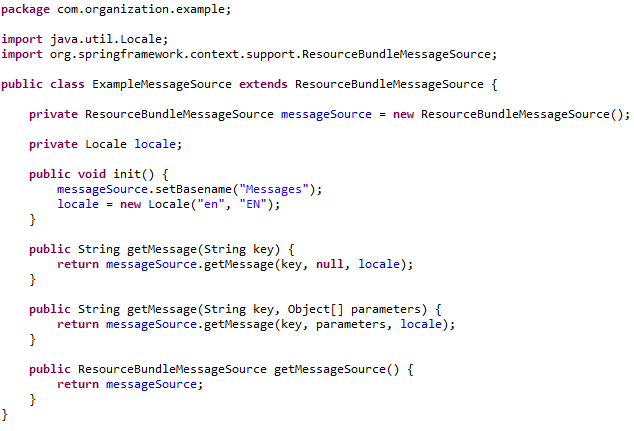
  • As the last step, we want to encapsulate i18n utility class and also want to use a more  capable i18n utility (e.g.  ResourceBundleMessageSource). For this, define a class as below:
Customized and encapsulated message source (i18n utility) class


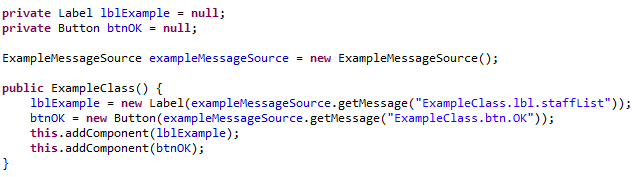
  • Finally, change "Messages.getString" statements into your new instance:
Class with externalized strings (with customized i18n utility class)


  • You can also externalize parameterized strings using your class. Its usage will be as follows:
Getting a parameterized string from i18n utility


Defining a parameterized string in property file