Pages

Showing posts with label Software Sites and Products. Show all posts

Wednesday, February 26, 2014

Software Version Controlling Best Practices


Always use version controlling
Use version controlling/source control even if one developer exists. This issue brings change tracking and versioning of the application continuously. For multi developers, it brings more benefits like co-working on same files and fast codebase updates.

Do not commit halfdone work

Each commit should consist of a complete task (issue, bugfix, etc.). Partial commits may cause unfunctionality, crash of application or even compilation errors.

Full Update -> Build -> Run -> Full Commit rule
For having no trouble, a stable version controlling process should be applied. According to this process, you should full update the code, then build and run your application. If application runs correctly, you should commit all of your updated files. While committing, inspect all of your changed files and changes. If all team members apply this process, application will always continue to run and no one will prevent others work. 

Commit atomicity/granularity
Do not use version controlling system to backup each single file separately and do not commit hundreds of files after days or weeks of development. Commits should be atomic, and as a best practice, should include files which are related with only one task. Late commits also brings more conflicts.

Use descriptive commit messages
Commit messages are important for tracking changes. Descriptive commit messages help developers to control old versions of code within a functional context, instead of date and time only.

Don't commit generated files
Use "ignore" funcionalities of your version controlling tool to ignore commiting and updating of generated files (e.g. target folders, user settings, IDE generated files, generated classes after each build etc.) By doing this, you will not waste your time for managing those unstable/unimportant files.

Continuous integration
Use continuous integration along with version controlling. By doing that, perform automated builds and deploys to a specific location. Also, configure the tool to create a separate version number (with a predefined versioning algorithm, e.g. <major_changes>.<minor_changes>.<bug_fixes>) for each build. This will be useful to trace tests and deployments.

Use qualified version controlling tools and plugins (especially for merge)
Version controlling tool quality is also important. It must at least show changed files clearly, give ability to merge conflicted files easily and view old versions of files. Besides, it will be better to have a branching function to manage versions and and issue tracking system synchronization to manage issue-related code file matchings.

Use branches for testing and different lines of code
You should use different code branches for development, testing and also production. If a version of code is being tested, development should not continue on that branch. Development can continue on another branch and when a new version will be tested after fixing some bugs and adding new properties, a new test branch should be provided with a new version. When a stable test branch is reached, it may be released as a production branch.


You can also take a look at the below link for version controlling basics:
http://betterexplained.com/articles/a-visual-guide-to-version-control/


Monday, January 14, 2013

A Serverless, Zero-Configuration Database Solution : SQLite


Most software need saving data. Sometimes that data is predicted to be small and hundreds or thousands of transactions on it will not be needed at the same time. But you will need some SQL-like operations on that data, because some modifications can be difficult and time consuming with regular file operations. At that time, SQLite becomes a very practical solution to this situation.

It started as a C/C++ library (on http://www.sqlite.org/) but it also has Xerial jdbc project for Java (on http://www.xerial.org/trac/Xerial/wiki/SQLiteJDBC and https://bitbucket.org/xerial/sqlite-jdbc lastly). We will tell some details of Java JDBC project here. Some critical properties are:

  • You need only one jar file and adding it to the classpath.
Download latest jar (from here: https://bitbucket.org/xerial/sqlite-jdbc/downloads) and add to the classpath. 
  • Needs one line of code to start using.
Class.forName("org.sqlite.JDBC"); line is enough for activating driver.
  • It creates one database file per schema at the place which you will determine.
Connection con = DriverManager.getConnection("jdbc:sqlite:mydb.db"); line creates "mydb.db" file as database file on the root of your project and creates a connection for DB operations.
  • Supports a general formed JDBC SQL syntax with a useful JDBC API.
Some code examples are shown below (connection opening/closing statements are not included each time for simplifying statements):

  1. // opening connection
  2. Connection con = DriverManager.getConnection("jdbc:sqlite:person.db");
  3. Statement stat = con.createStatement();

  4. // closing connection
  5. con.close();
  6.  
  7. // creating table
  8. stat.executeUpdate("create table person(id INT, name varchar(30));");
  9. // dropping table
  10. stat.executeUpdate("drop table if exists person");
  11. // inserting data
  12. PreparedStatement prep = con.prepareStatement("insert into person values(?,?);");
  13. prep.setInt(1, 1);
  14. prep.setString(2, "andy brown");
  15. prep.execute();
  16. // selecting data
  17. ResultSet res = stat.executeQuery("select * from person");
  18. while (res.next()) {
  19.      System.out.println(res.getString("id") + " " + res.getString("name"));
  20. }
  21. // updating data
  22. PreparedStatement prep = con.prepareStatement("update person set name = ? where id = ?;");
  23. prep.setString(1, "andy black");
  24. prep.setInt(2, 1);
  25. prep.execute();

For more detailed examples about SQL syntax, please take a look at:
http://docs.oracle.com/javase/tutorial/jdbc/index.html

Friday, November 30, 2012

Software Unit Testing and Best Practices


Software Unit Testing is about testing of individual units of source code. Those units are generally methods and they are grouped by class names (called as Test Case). 


For example, if you have an XYZUtility class which having methodA, methodB, methodC methods, you will potentially have an XYZUtilityTestCase class having methodATest, methodBTest and methodCTest tests.

Unit tests must cover as much code as they can while running, but it is not the primary purpose. Code coverage is prefferred to be high as a result but the main purpose of the unit tests are:
  • Testing output of a function with specific inputs. Those inputs must include boundary (min/max) values and potential exceptional values (divide by 0 etc.). And the inputs are also preffered to be chosen for covering all condition cases of the method.
  • Documenting the software. One of the self-documenting code development techniques is unit testing. It shows usage of the code section.
  • Increasing modularity, flexibility and extensibility of the code along with concerning the developer with the interface before implementation, in Test Driven Development (TDD) approach.
There are also 5 important properties for unit tests that must be obeyed according to Andy Hunt's Pragmatic Unit Testing book.

  • Automatic
Unit test results (pass/fail) must be controlled automatically with tools. And generally more than one tests are need to be run together. A test should not have a manual step which stops execution of all tests.
  • Repeatable
A unit test must be repeatable. In other words, if it passes on a certain version of code, it must always pass with that code or if it fails on a certain version of code, it must always fail with that code. Database changes or other external services or files etc. should not change the result of the unit test.
  • Independent
Unit test results must be independent of other unit tests. If a unit test result changes after changing the running order or other environment change (database data etc.), it can not be called as a unit test.
  • Thorough
A unit test must control every condition as it can (all possibilities, exceptions, boundaries ...). Its code coverage must be as much as it can and controlled conditions are preferred to be logical and functional.
  • Professional
Unit test code must obey coding standards of the project which it belongs to, because it also is  a professional code. Furthermore, it was stated before that unit test is another way of self-documenting code. Clean and understandable unit test code will bring better documentation.

As a last word, for providing repeatable and independent unit tests, using mock objects is a good practice. Mock objects replaces the external sources (database, services, etc.) and returns predefined results. A good object oriented design having required amount of interfaces will  simplfy the creation of mock objects. You can also use some API's like EasyMock or Mockito


Thursday, October 18, 2012

Best Must-Read Books for Software Engineers


Here are the CodeBuild selection of must-read software engineering books. Books are grouped according to their content with some description.

  • Reference Books
These Robert C. Martin and Gang of Four books are very fundamental OOP resources for every software engineer.

    
  • Coding Perfection
These Steve McConnell, Robert C. Martin and Joshua Bloch books are very helpful with increasing your coding skills.


  • Refactoring and Patterns
Refactoring and patterns are very important issues of OOP, which brings quality and maintainability. These Martin Fowler and Joshua Kerievsky books are maybe the best references about this issue.


  • Pragmatic Programming
Andrew Hunt's and David Thomas's "pragmatic" approach to programming brings very important viewpoints to software engineering.


  • Project Management
There are many project management books in the market but  Frederick P. Brooks Jr. and Tom DeMarco presents very impressive important viewpoints to project management.


Monday, October 15, 2012

Start Android Development in 5 Minutes


Android OS is the most popular mobile OS nowadays (leading market with %46.9 above iOS's %18.8). Besides, globally over %20 of computers are mobile devices. So, over %10 of people in the world uses Android OS and softwares related with it. For this reason, Android application development is a very important issue for developers and software engineers. 

This post will describe a fast (5 minutes, excluding tool download periods) and simple startup of an android project on Eclipse IDE, for developers who deal with the matter.

1. JDK and Eclipse IDE:

Download and install appropriate JDK for your computer and OS (JDK 6 or 7 are preferred)

Download latest Eclipse distribution, unzip it to your computer.

2. Android SDK:

Download and install android SDK:

Run Android SDK and install some API (e.g. 8, 14, 16, ...). Android distributions have various APIs and your application API must be compatible with your device. This step may also be performed using Eclipse ADT plug-in Android toolbar buttons. For each API, "SDK Platform" is required. "SDK Tools" and "SDK Platform Tools" under "Tools" menu and "Android Support Library" under "Extras" menu should be installed for general usage.


Don't forget to set your Android SDK directory on Eclipse Window --> Preferences:


3. Eclipse ADT Plugin:

Start Eclipse. Click Help --> Install New Software, paste adress below and click OK:


Select "Android Development Tools" from "Developer Tools", click "Next" various times and finish installation.

You will see Android SDK (which performs installing different APIs as told in step 2) and Android emulator buttons on the top panel. You can also start Android projects from now on.


4. Android Emulator:

Android SDK includes a useful emulator for testing. After installing ADT plug-in, you can start emulator by "Android Virtual Device Manageer" button from toolbar. After that you may add one or more android devices with different API and system configurations.


You can have detailed info about emulator usage and command line parameters here:

5. Creating Project:

Select File --> New --> Project --> Android Application Project. You can also start an Android Sample Project for exercising. 


You must select "Build SDK" and "Minimum Required SDK" while creating project. 


After that right click your project and select "Run". Your project will run on selected emulator.

After this short and simple start, you may want to look at these:


Thursday, September 27, 2012

5 Common Automized Software Quality Metrics (with Pros & Cons)


1. Source Lines of Code (SLOC)
Counting lines of code is probably the most simple method. It mostly indicates the scale of the software and gives an input for project growth and planning. For example, if we get SLOC count once a month, we may sketch a graph of project growth. Of course this is not reliable due to refactoring and design phases but may give a viewpoint.

SLOC may be counted as Source Logical Line of Code (SLLOC) for better info. Logical code lines does not include empty lines, one char brackets and comment lines. You can easily calculate SLLOC using tools like Metrics

Line of code should not be used for evaluating developer performance. This may cause duplicate, unmaintainable and unprofessional code.


2. Bugs per code_section/module/time_period
Bug tracking is essential for better testing and faster maintainability. If bugs are tracked, bugs per code section, module or specific time period (day, week, month etc.) may be calculated easily by reporting tools (e.g. Mantis). If this value is obtained, bug causes may be noticed and intervened early.

Bug count may be used as one of the inputs of evaluating developer performance, but attention must be paid. If it is most important evaluation method, software developers and testers may become enemies. In a productive company, all employees must be coherent with each other.

For better evaluation, bugs may be classified as low, medium, high etc. for weighting, because their importance and resolving costs are not the same. 


3. Code Coverage
Code coverage states the degree to which the source code of a program has been tested. Automaticity of code coverage calculation is a plus. There are so many tools which perform that operation (e.g. Cobertura). 

Code coverage does not represent the whole quality of unit tests, but may give some info about test coverage. It may be used as a software metric together with a few other test metrics. Also unit test codes, integration test scenarios and results should be reviewed frequently.

4. Design/Development Constraints
There are so many design constraints and principles for software development. Some of them are:
  • Class/method length,
  • Number of methods/attributes in a class,
  • Method/constructor parameter counts,
  • Magical number, string usage in code files,
  • Comment lines percentage etc.
These are important for code maintainability and readability. Development teams may choose a few (or all) of those metrics and follow them with automized tools (like maven pmd plugin). This will raise the quality of produced software.


5. Cyclomatic Complexity
We separated cyclomatic complexity from other design/development constraints because its concept is a bit different. Cyclomatic complexity is about the detailed implementation and code execution. It also may be calculated automatically with tools like pmd.

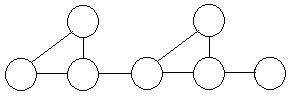
It is calculated as "the count of the number of linearly independent paths through a source code section". For example, if there are a path diagram of a source code section as below:


Cyclomatic Complexity = E(edges) - N(nodes) + 2P (exit nodes)
So, Cyc.Cmp. = 8 - 7 + 2*1 = 3

You can also see that there are 3 different paths from leftmost node to rightmost node. This value can be calculated especially for methods, using the whole method source as the execution path. Some upper limit numbers (6, 8 or 10 etc.) may be defined according to the project type.

Only one metric does not detect the quality of your whole project or solve everything. If you use more metrics, you will have more viewpoints about the quality of your project. 


Tuesday, January 10, 2012

Java Dynamic Web Project to Maven 3 Project - Migration Steps


If you start a java project in eclipse as "maven project" at the beginning, all you need is downloading maven distribution or maven plug-in and add dependencies to the pom.xml file when required. But some issues exist while migrating from java dynamic web project to maven project. In this post, required configuration steps will be told. Maven introduction, installation, "repository" concept and maven commands are out of scope for this post.


  • Source codes for a maven project must be located in src/main/java folder. Also test and resources must be located in src/test/java and src/main/resources folders respectively. For this conversion, you can create required folders manually and copy old source codes in it, but more preferred and stable way is defining source paths in Project Properties --> Java Build Path section:
Source folder configuration
  • /WEB_INF folder is not used in maven projects. There is "webapp" folder instead. You can move WEB_INF files into webapp folder as the given structure and delete old WEB_INF folder. You don't even need lib folder because maven will create required jars:
webapp folder

  • target/classes folder must be the output (deploy) path instead of build/classes. Again in Project Properties --> Java Build Path section:

Output folder

  • org.eclipse.wst.common.component file needs some changes. Open it using ctrl+shift+R and edit deploy path and output path as below:

org.eclipse.wst.common.component file

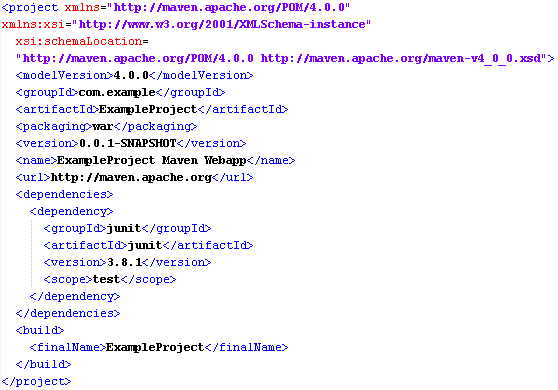
  • Create pom.xml file on project root folder and configure required sections with your project details. Then add required dependencies one-by-one between tags (This will be the most time consuming issue if there are tens or hundreds of JARs). If maven global repository has required jar, it will be downloaded automatically, otherwise you must find required jar and run "mvn install" command to install that jar to maven repository:
pom.xml file

  • Run mvn-install or mvn-package commands for the project. Created JARS, web.xml, other resources and class files will be located under /target folder automatically. Also a WAR file for the project will be created. You can copy WAR file to server (e.g. apache tomcat) and run the application, or you can run the application using the server defined in eclipse. 

target directory

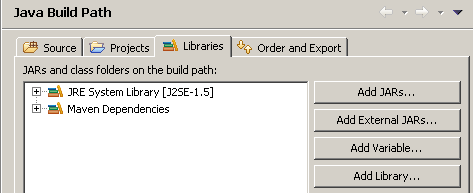
  • Depending on the running style of mvn-install command (by plug-in, command etc.) , created JARs under the /target folder may not be copied to src/main/webapp/WEB-INF folder. If you will run the application using the server of the ide, you may be needed to copy created libs into src/main/webapp/WEB-INF/lib folder and add those libs to project using Project Properties --> Java Build Path --> Libraries --> Add JARs section for once.
    Adding required jars under webapp/WEB-INF/lib

    Thursday, December 29, 2011

    A Selection of Successful Software Engineering Posts (2011)


    This selection contains 25 blog posts selected by CodeBuild which were placed on DZone in 2011.

    Java
    Producer and Consumer Pattern in Java
    Quick Tip for Improving Java Apps Performance
    JUnit Tutorial 2
    Clientside Improvements in Java 6 & 7
    Java Productivity Report 2011 (India vs Rest of the World)
    Be a Better Java Programmer - A Reading List
    Method Size Limits in Java
    Why I Choose Java?
    Best Practices List in Java
    Lessons in Software Reliability
    Music Components in Java Effects
    WWW: World Wide Wait - A Performance Comparison

    Software Engineering & Practices
    The Principles of Good Programming
    A Detailed Study on Understanding Code
    Making Better Software - Forget New Features
    Making Code Easy to Understand What Developers Want
    Things to Remember When Doing Code Review
    The Seven Phases of Introducing Continuous Integration

    General
    The Most Important Man in Tech Dies Last Week…It wasn't Steve Jobs.
    The Top 10 Attributes of a Great Programmer
    Build Facebook Bot in 2 Easy Hours
    30 Free Programming E-Books
    Signs That You're a Bad Programmer
    A Complete List of All Major Algorithms (300)
    10 Android Articles/Tutorials


    Wednesday, December 28, 2011

    Improve Software Quality with Tools and Processes


    As most of the software developers know, software engineering is not just "coding". It's a complex process which requires engineering vision, analytical thinking, designing and software process management supported with tools. This article contains some important approaches, techniques and tools to improve software production quality.

    Software quality depends on time and cost of course. But you can be sure that spent money and time will return as so much more. Quality standards will also be used for upcoming projects and increase company growth speed on midterm.


    • Choose a suitable process model and apply it correctly
    As you know there are software process models like agilescrumiterative and incremental etc. Choose one of these according to the project type. You don't have to perform all rules strictly, you can modify most of them. The point is "using a process" here, for a systematic and ordered development.


    • Control the version of each required source
    Using a version controlling system is a must. Even if only one developer exist, it must be used. Historical data, versioning, merging, ... is very important for increasing productivity. Otherwise developers will wait each other, can not detect performers and lines of previous changes, can not perform versioning systematically etc. SVNCVS and TFS are used for this purpose.

    • Track issues with easy-to-use tools
    Parallel with using a process model, issue tracking tool usage is essential. JIRA-like tools are useful and easy-to-use. By tracking issues, you can track productivity and software growth and get production reports easily. Besides, those tools can be used to monitor developer work-hour productivity.

    • Perform and manage documentation
    Perform documentation as required (e.g. %10 of total production time). No documentation is never a good solution as much as excessive documentation. It may include code documentation, requirement specifications, design documents, test documents, user manuals etc. Those documents are needed to be managed and shared also, by using version controlling tools or web based platforms (like Confluence). 

    • Use dependency management tools
    Managing dependency libraries (library projects, jars, DLLs etc.) are a big problem especially for big projects. Configuring libraries to run the application after each release or after each project check-out is a hell. Use a dependency managing tool like Maven or at least auto build/copy script tools like Ant.

    • Use continuous integration
    Building, deploying and versioning software is a big problem. Its time consuming and reduces productivity. Because of these, use a continuous integration tool (Hudson for example) and integrate it with dependency management or build tools (like MavenAnt, ..). The tool may be configured to perform a build on each commit, on clicking a button manually or on predefined periodic times...

    • Perform testing and integration testing constantly
    Testing is very important for software quality. Test documentation which may consist test scenarios, results and relations with issues is required.  Also, testing (UI testing, integration testing, ...) must be performed constantly and periodically. Even if changing a single line of code may crush the whole system or crash a hidden functionality. for example, JUnit is very popular for Java applications.

    • Perform unit testing and automatize it
    Unit testing is as important as the other testing methods. Unit tests provide pre-detection of most of the problems. By performing qualitative unit testing, time consumption for other testing methods also descreases. Automatizing these tests using continuous integration tools or at least command line tools (Hudson with Maven for example) are important to keep software consistency and reliability.

    • Collect metrics from production and use results
    Coding metrics (e.g. line of code, abstraction ratio, cyclomatic complexity, ...) gives us some good viewpoints about software. For example, by using line of code maybe we can't (or we mustn't) determine the productivity of a developer; but we can determine the growth speed of software monthly. Complexity-like metrics tells us design errors before deployment. These metrics can be collected by tools or plug-ins (e.g. CodePro Eclipse plug-in). 

    • Follow best practices of coding and control with tools
    There is no "golden rule" suitable with all software projects, but there are best practices for project management, architecture, designing, coding, testing for most situations. Performing those rules will increase the quality. For example, you can define rules for code production (about indentation, commenting, magic numbering, paranthesis etc.) and monitor convenience automatically and periodically with external tools or plug-ins like Maven Surefire Report plug-in.

    Monday, October 10, 2011

    Hibernate 3 Installation & Configuration


    Short Description:
    Hibernate is an ORM framework for Java applications, which maps application objects into relational database tables. It is important because:
    • Developers don't write SQL expressions into code. This saves time and increases maintainability.
    • It is database independent. DBMS can be changed without changing the code. Only configuration XML is modified for this.
    • It supports transaction methods and auto-creation of tables, constraints, relations (1-N,1-1, N-N, etc.).
    Installation:
    Requires two steps:

    1. Copying required JARs into /lib directory:
    2. Creating and configuring persistence.xml configuration file.
    Required JARs are: 
    Hibernate installation JARs
    Hibernate requires only hibernate3.jar. But hibernate-jpa jar is also used generally for additional JPA properties. A database connector jar is also reqiured for connection handling. mysql-connector jar is used here for this reason. Other jars are required because of dependencies. These jars can be found on most Java developer download site with exact version numberings.

    persistence.xml file is also required to map application into database. Database configuration is done in this file. It is put into /src/main/config/META-INF folder as default. Content should be as below:


    Hibernate persistence.xml configuration

    • persistence-unit name: Defines the configuration id. More than one persistence unit can be defined at once.
    • hibernate.connection.driver_class & hibernate.dialect: Defines the database type. MySQL is used in this example.
    • hibernate.connection.username & hibernate.connection.password: Defines database connection parameters.
    • hibernate.connection.url: Defines database server name, port and schema. "test" is used here for schema name.
    These two steps are required and enough for starting Hibernate usage. Hibernate entity definition and API usage will be explained in upcoming posts.

    Friday, October 7, 2011

    A Quick Reference to the Spring 3 DI Bean Configuration


    Spring 3 DI (dependency injection) functionality which placed in "Spring Core" is very important for managing objects (or "beans") in enterprise applications.


    Here is a quick reference for bean configuration of Spring DI:
    Spring Bean Configurations 


    You can get a bean in application by

    manual:
    ApplicationContext context = new ClassPathApplicationContext(new String[] {“application-context.xml”})
    ViewManager viewManager = (ViewManager)context.getBean(“viewManager”);

    annotation:
    @Autowired
    ViewManager viewManager;


    Friday, June 24, 2011

    Develop Rich Web Applications with Java by Vaadin Framework (Introduction)


    Vaadin (http://vaadin.com/home) is an open source web application framework having a server-side architecture which constructs user interface of web applications as RIA (rich internet applications), using Java code only.

    Vaadin Logo

    For developing Vaadin applications, you only use Java code, like Java Swing. This Java code is then converted to GWT (Google Web Toolkit) components (which are HTML and Javascript based) for browser side, and AJAX code sections are generated for some actions to support RIA concept. Server side validation is also performed for all actions.

    An example source code is shown below:

      
    import com.vaadin.ui.*;

    public class HelloWorld extends com.vaadin.Application {
        public void init() {
            Window main = new Window("Hello window");
            setMainWindow(main);
            main.addComponent(new Label("Hello World!"));
        }
    }


    And the result is: 

    Vaadin Hello World Example

    Vaadin supports so many UI components and these can be extended with new GWT components if required, and CSS themes can be applied to results. For using Vaadin, only a JAR file is enough. Some Eclipse and NetBeans plugins are also available for easier development if required.

    Vaadin supports JPA (java persistence API) container package JAR for database operations. By using containers, you can associate components to database operations directly, e.g. if the item list of a container changes, related visual component’s list is changed too.

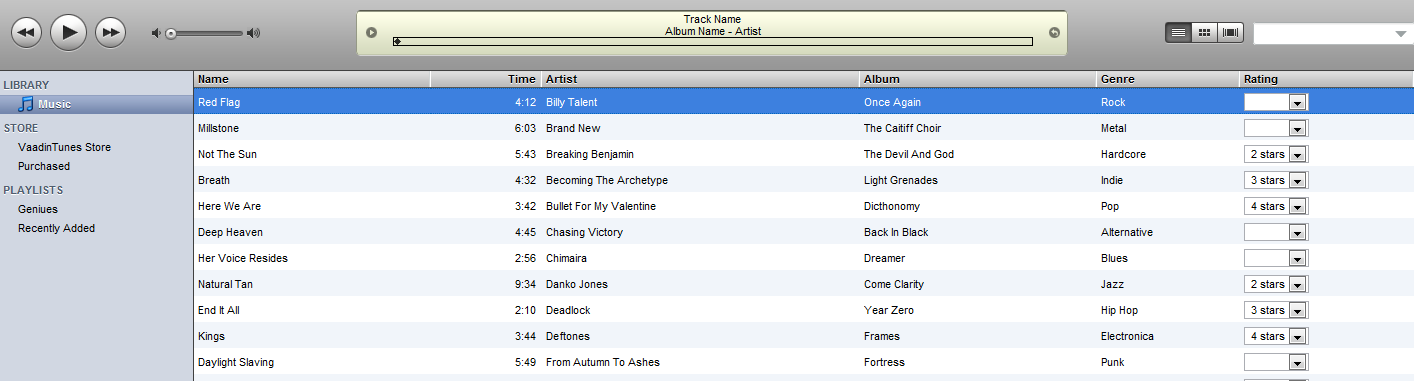
    Here is an example view of a Vaadin application layout VaadinTunes (http://demo.vaadin.com/VaadinTunesLayout/):

    Vaadin Tunes

    Because of Vaadin UI components are generated automatically from Java code, they may generally have some complex structure and a bit slow compared to a pure HTML page. For increasing the performance, some optimization rules are suggested: http://vaadin.com/wiki/-/wiki/Main/Optimizing%20Sluggish%20UI 

    But development time gain is very high and rich & interactive web components can be developed without any script language information. These parameters must be considered while choosing the technology.

    Vaadin is very well documented. You can take a look at “Book of Vaadin”: