- Don't manage business logic with exceptions. Use conditional statements instead. If a control can be done with if-else statement clearly, don't use exceptions because it reduces readability and performance (e.g. null control, divide by zero control). .
- Exception names must be clear and meaningful, stating the causes of exception.
- Throw exceptions for error conditions while implementing a method. E.g. if you return -1, -2, -3 etc. values instead of FileNotFoundException, that method can not be understand.
- Catch specific exceptions instead of the top Exception class. This will bring additional performance, readability and more specific exception handling.
- Null control with conditionals is not an alternative to catching NullPointerException. If a method may return null, control it with if-else statement. If a return may throw NullPointerException, catch it.
- Try not to re-throw the exception because of the price. Bu if re-throwing had been a must, re-throw the same exception instead of creating a new exception. This will bring additional performance. You may add additional info in each layer to that exception.
- Define your own exception hierarchy by extending current Exception class (e.g. UserException, SystemException and their sub types) and use them. By doing this you can specialize your exceptions and define a reusable module/layer of exceptions.
- Use types of exceptions clearly. Fatal: System crash states. Error: Lack of requirement. Warn: Not an error but error probability. Info: Info for user. Debug: Info for developer.
- Don't absorb exceptions with no logging and operation. Ignoring exceptions will save that moment but will create a chaos for maintainability later.
- Don't log the same exception more than once. This will provide clearness of the exception location.
- Always clean up resources (opened files etc.) and perform this in "finally" blocks.
- Exception handling inside a loop is not recommended for most cases. Surround the loop with exception block instead.
- Granularity is very important. One try block must exist for one basic operation. So don't put hundreds of lines in a try-catch statement.
- Produce enough documentation for your exception definitions (at least JavaDoc).
- Giving a number/code for each different exception message is a good practice for documentation and faster communication.
Tuesday, January 31, 2012
15 Best Practices for Exception Handling
Tuesday, January 10, 2012
Java Dynamic Web Project to Maven 3 Project - Migration Steps
If you start a java project in eclipse as "maven project" at the beginning, all you need is downloading maven distribution or maven plug-in and add dependencies to the pom.xml file when required. But some issues exist while migrating from java dynamic web project to maven project. In this post, required configuration steps will be told. Maven introduction, installation, "repository" concept and maven commands are out of scope for this post.
- Source codes for a maven project must be located in src/main/java folder. Also test and resources must be located in src/test/java and src/main/resources folders respectively. For this conversion, you can create required folders manually and copy old source codes in it, but more preferred and stable way is defining source paths in Project Properties --> Java Build Path section:
 |
| Source folder configuration |
/WEB_INF folder is not used in maven projects. There is "webapp" folder instead. You can move WEB_INF files into webapp folder as the given structure and delete old WEB_INF folder. You don't even need lib folder because maven will create required jars:
 |
| webapp folder |
- target/classes folder must be the output (deploy) path instead of build/classes. Again in Project Properties --> Java Build Path section:
 |
| Output folder |
- org.eclipse.wst.common.component file needs some changes. Open it using ctrl+shift+R and edit deploy path and output path as below:
 |
| org.eclipse.wst.common.component file |
- Create pom.xml file on project root folder and configure required sections with your project details. Then add required dependencies one-by-one between
tags (This will be the most time consuming issue if there are tens or hundreds of JARs). If maven global repository has required jar, it will be downloaded automatically, otherwise you must find required jar and run "mvn install" command to install that jar to maven repository:
 |
| pom.xml file |
- Run mvn-install or mvn-package commands for the project. Created JARS, web.xml, other resources and class files will be located under /target folder automatically. Also a WAR file for the project will be created. You can copy WAR file to server (e.g. apache tomcat) and run the application, or you can run the application using the server defined in eclipse.
 |
| target directory |
- Depending on the running style of mvn-install command (by plug-in, command etc.) , created JARs under the /target folder may not be copied to src/main/webapp/WEB-INF folder. If you will run the application using the server of the ide, you may be needed to copy created libs into src/main/webapp/WEB-INF/lib folder and add those libs to project using Project Properties --> Java Build Path --> Libraries --> Add JARs section for once.
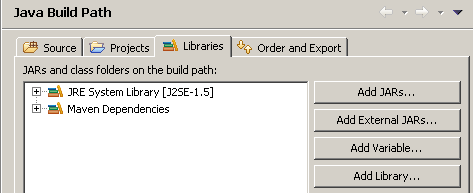 |
| Adding required jars under webapp/WEB-INF/lib |
Subscribe to:
Posts (Atom)